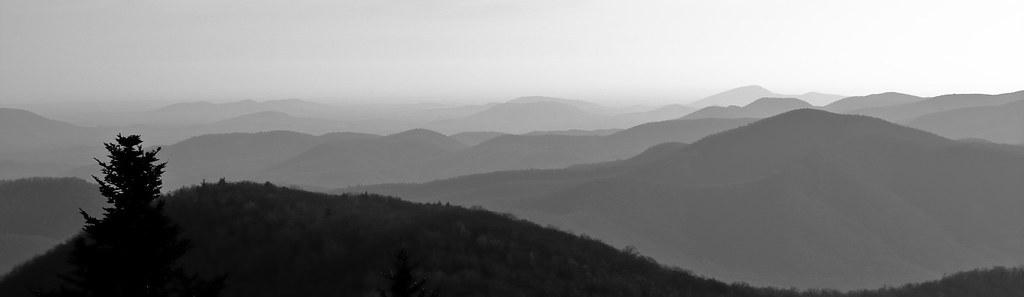
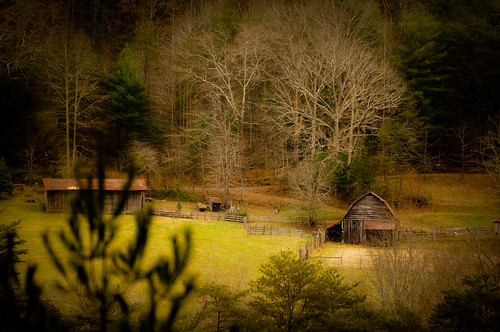
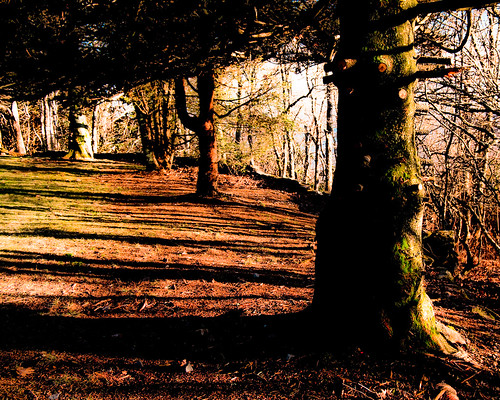
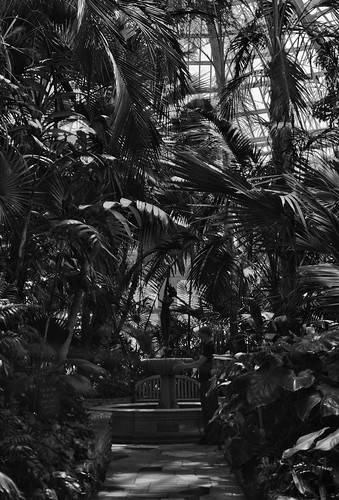
North Georgia contains some beautiful country. I love getting up in the mountains and immersing myself in natures wonders. The skies cleared up from the heavy rains, and showed the wonder of the smoky mountains.
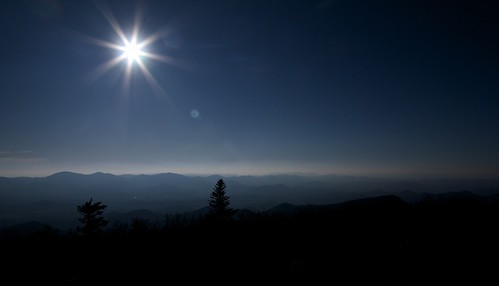
The sun shining brightly above
The streams form into pleasing waterfalls
and run down to form beautiful lakes, reflecting under the blue skies
and you never know what you will find in the next mountain valley
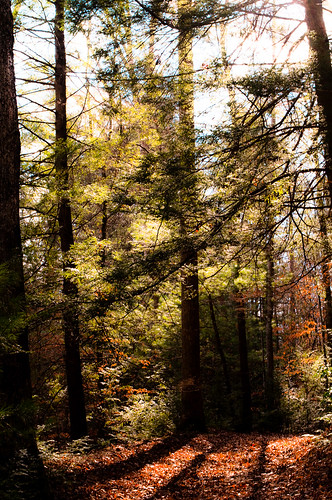
The path glows with light, illuminating the floor of the dark forest
Trees lie in slow decay
and the sun sets early, casting its long shadow
Oh the beauty of Georgia.
I love the mountains, whether the Great Smokies or the Rockies, there is always something to photograph.
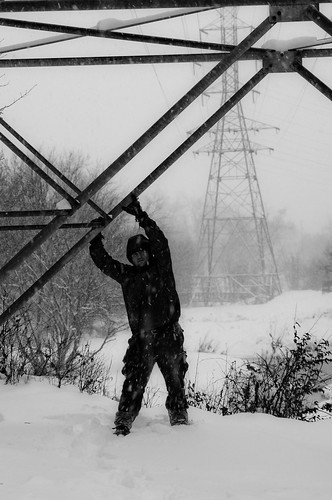
Having used the K20d in extremely cold weather, I have been waiting for a chance to use my K-7 and SMCP DA★ 60-250mm f/4 in similar. I lucked out today in that work was canceled due to 12" (30 cm) of snow, strong winds, and a temperature of 8 °F (-13 °C). What better time to break out the snowshoes and go for an hour hike in the woods?
The first picture of Luna trying to stay warm. I took this shot because the camera records to temperature inside the camera body in the EXIF data and I needed a baseline shot. Camera had been sitting inside.
Camera temperature: 70 °F (21 °C)
I drove to the park and unloaded my gear and put my snowshoes on. It took me a few minutes to get ready and I had my camera set on the cold ground while I was getting ready. I took a shot near the beginning to get the initial outdoor temperature of the camera. Ambient temperature started at about 12 °F (-11 °C)and ended at about 8 °F (-13 °C).
Camera temperature: 48 °F (9 °C), 3:40 pm (EXIF is off by 1 hour).
Then I walked around for a bit and took a picture of the stream,
Camera temperature: 37 °F (3 °C), 3:50 pm
Held up an electricity pylon to keep it from falling over,
Camera temperature: 28 °F (-2 °C), 4:05 pm
Walked through the forest,
Camera temperature: 27 °F (-3 °C), 4:13 pm
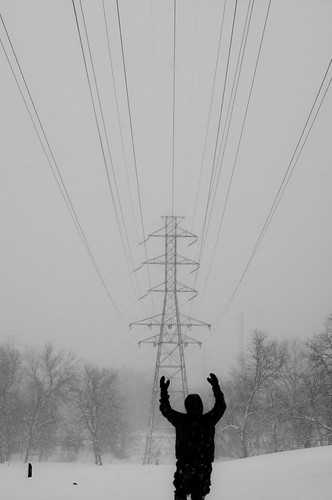
Waved my hands at another pylon,
Camera temperature: 25 °F (-4 °C), 4:17 pm
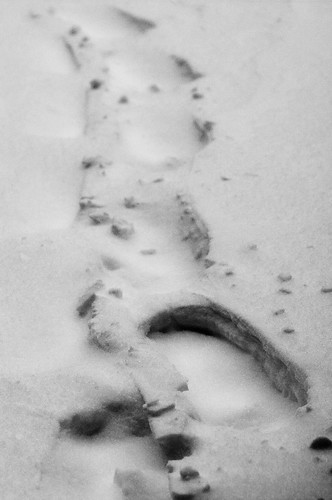
Left some tracks in the snow,
Camera temperature: 25 °F (-4 °C), 4:24 pm
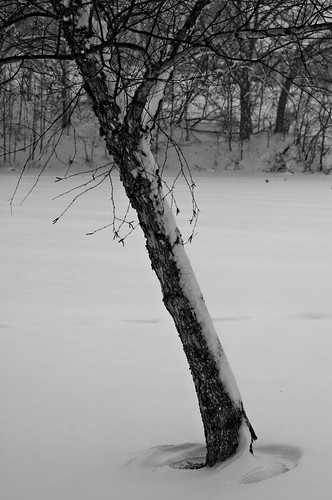
and finally watched a tree try to blow away, but settled for being buried by snow,
Camera temperature: 23 °F (-5 °C), 4:28 pm
The camera had no hiccups in the extreme cold today, now I can't wait to try it in sub 0 °F conditions, but that will have to wait for a cold day. The zoom ring on the 60-250mm did get slightly stiff, but was still very usable. Focus was perfectly smooth, and I noticed no impact to focus performance. Battery is still showing full after 150 pictures or so in the cold.
I was surprised at how easy the K-7 was to use with ski gloves given the small button size. The worst part is actually the locking mode dial, which I find easy with no gloves (middle and thumb to turn, with index finger depressing the lock). T
Touching a metal camera body with your hands at sub zero temperatures is not so pleasant, but whatever finish the camera has helps a bit. Thankfully you should be wearing gloves if the temperature is below freezing.
What I notice is that this K-7 operates significantly cooler than the K20d, which maintained an internal temperature above freezing in much colder ambient temperatures (about -25 to -30 °F). When the weather gets extremely cold I might do a stress test to see how long the camera will run before shutting down.
Another great cold weather Pentax, but I do need to dress warmer next time as I thought I might freeze :)
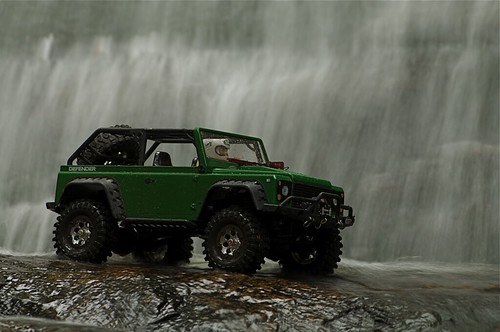
Scale model truck (Radio Controlled) sitting in front of a waterfall. The goal was to show the truck an environment that makes the 1/10th scale truck difficult to determine.
I had to climb out into the water fall to get the shot. The water must have been only 50 degrees or less, so it was a bit cold on the feet. Good thing it was fairly warm outside.
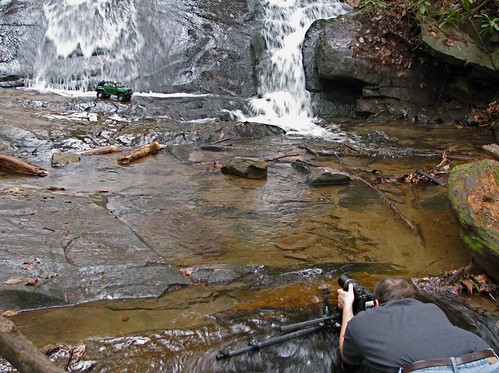
Here is the setup shot:
I used the DA* 60-250mm f/4 because it was weather sealed and it provided the reach and background separation I wanted. Don't be afraid to get dirty to get the shot you want.
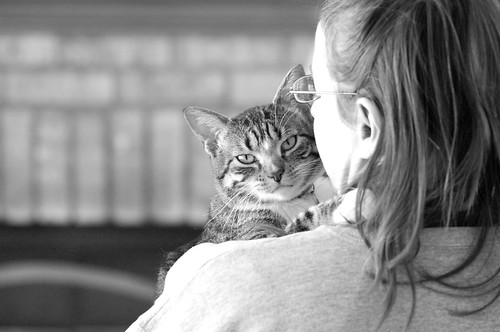
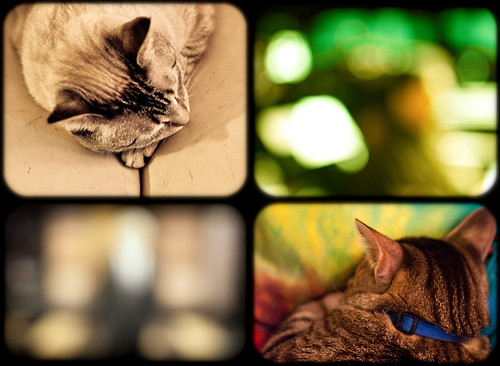
These litter-mates lay peacefully, deep in sleep, dreaming about what tomorrow will bring.
How neatly a cat sleeps,
Sleeps with its paws and its posture,
Sleeps with its wicked claws,
And with its unfeeling blood,
Sleeps with ALL the rings a series
Of burnt circles which have formed
The odd geology of its sand-colored tail.
I should like to sleep like a cat,
With all the fur of time,
With a tongue rough as flint,
With the dry sex of fire and
After speaking to no one,
Stretch myself over the world,
Over roofs and landscapes,
With a passionate desire
To hunt the rats in my dreams.
I have seen how the cat asleep
Would undulate, how the night flowed
Through it like dark water and at times,
It was going to fall or possibly
Plunge into the bare deserted snowdrifts.
Sometimes it grew so much in sleep
Like a tiger's great-grandfather,
And would leap in the darkness over
Rooftops, clouds and volcanoes.
Sleep, sleep cat of the night with
Episcopal ceremony and your stone-carved moustache.
Take care of all our dreams
Control the obscurity
Of our slumbering prowess
With your relentless HEART
And the great ruff of your tail.
-- Pablo Neruda
Our eyes can only see a small slice of the energy radiated from the Sun. We call the energy that we can see "Light". If we look at a rainbow there are the 7 colors: red, orange, yellow, green, blue, indigo, and violet. However, there is energy that is high frequency than Violet called "Ultra Violet" (UV) and energy that is lower frequency than red called "Infra Red" (IR).
Thankfully, digital sensors are very sensitive to light in the near infrared spectrum, but the sensors are not sensitive to heat that is far beyond the visible red light (far infrared). Energy with a wavelength of about 10,000 nm is perceived by us as heat, and it takes a different kind of camera to see heat.
However, since digital sensors are so sensitive to IR, the manufacturers install IR cut filters directly on the sensor to prevent the IR from spoiling color photographs (it turns black clothes gray, etc). Because of this it is best to convert the camera by removing the IR cut filter, although you can still take IR pictures without doing this, the shutter speeds will be very long.
You might also be thinking UV, but light in the UV sepectrum is mostly filtered out by the superb modern coatings on the lenses (and the glass itself), but the sensors are sensitive to it. Some older lenses or specialized quartz lenses can focus UV effectively.
The camera sees IR as intensity, with no hue or saturation to it. A true IR picture will therefore be black and white. If an IR picture is B&W, what is the point of using IR instead of visible B&W? Because objects in the world do not reflect IR the same as they reflect visible light.
IR is reflected from foliage in pretty uniform intensity, so pretty much all foliage will appear gray or white on an IR image. Also, a clear blue sky reflects almost not IR energy and will appear nearly black. IR is an excellent way to separate foliage from man made objects, and more. For example, a statue in a flower garden stands out as black against white, a traditional B&W would be lower contrast here.
Non-converted IR camera with 720 nm filter, B&W (Fujifilm S1 Pro)
Similar shot in visible light (Pentax K-2000)
Light has an associated wavelength to it. This wavelength determines if we can see the color of light or not. Infrared is everything above approximately 700 nm, and ultra violet is everything below approximately 400 nm. The smaller the wavelength the higher frequency, so 400 nm is a high frequency and 700 nm is a lower frequency.
Don't worry too much about these numbers, except when buying infrared filters. A 720 nm filter cuts off light below 720 nm, so only IR above 720 nm gets through (these filters look black if you look try to look through them). A 720 nm filter still lets some visible red through, but an 800 nm filter or above cuts off nearly all visible light and will offer a nearly black and white picture.
So how do you get started in IR? Well first, you need an IR filter. If you have an SLR you can just screw this filter into the lens and take a picture. The issue is you can't see to focus or compose, but the AF sensors in the camera should be capable of focusing IR light automatically. If you haven't modified the camera, the shutter speeds will be very long too, several seconds at ISO 100 in bright daylight.
If you aren't handy with tools you might buy a camera that has been converted to IR. This is a camera that has had the IR cut filter removed and replaced with an IR filter on the sensor (or left with no filter and the IR filter is placed on the lens.
What is involved in converting a camera to IR? If you are serious you can watch these 3 videos of me converting a Panasonic DMC-LZ5 to IR. The videos are a total of about 20 minutes (how long it took me to do the conversion).
Part 1:
Part 2:
Part 3:
So, if you want to get into IR photography, first you need a filter, then ideally you need a converted camera, and finally, you need to get out and take pictures! It is a blast.
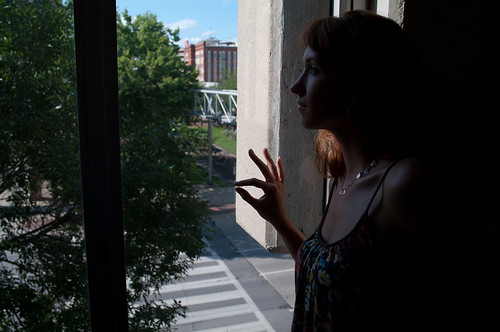
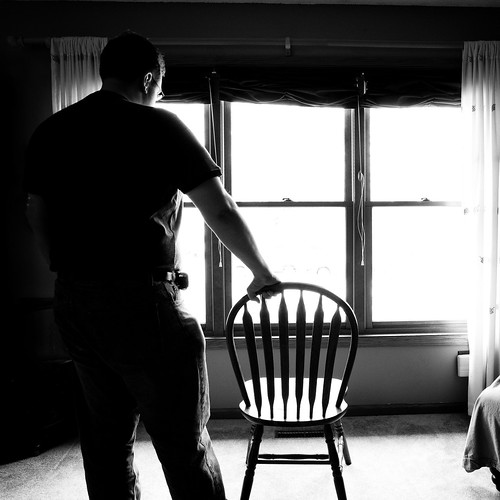
Had an idea for a shot that didn't quite turn out how you expected? Don't fret. Save the day in post processing. The above is how I pictured the shot in my head. A strong contrast B&W with a view outside the window. However, what I ended up with was the following.
I wanted her hand on the window, but when I converted to B&W it was in an awkward position that looked like she was giving a sign in mid air once I corrected the exposure. The initial shot was under exposed by about 2 f-stops from what I wanted. The light on her face wasn't strong enough relative to the outside light, and overall it would appear a dismal failure.
So how did I save the image? An inexpensive layer editing program for the Mac called Pixelmator. Once I learned how to properly use the program by reading Internet tutorials, I exported a partially corrected image from Lightroom that was near the exposure I wanted. I did this because Pixelmator can only develop RAWs with the default JPG setting.
Once in Pixelmator you duplicate the layer, adjust the exposure how you want, put the original layer on top, and then erase the original area where you want the adjusted areas to show through. Once you complete that step, you can merge the layers back into one. You repeat this several times until you end up with an image how you want.
After the exposure was set right I cloned out the awkward looking hand, and applied any other filters I wanted.
The question always remains, why didn't I just capture the photograph how I wanted in the first place? Well, first off, the camera doesn't allow strong enough curves for my B&W tastes, so post processing is required. And sometimes, you just don't see the shot until you get home and start processing. The important thing with B&W conversions is to capture the difference in light with the camera. Processing can be used to tweak it exactly how you want.
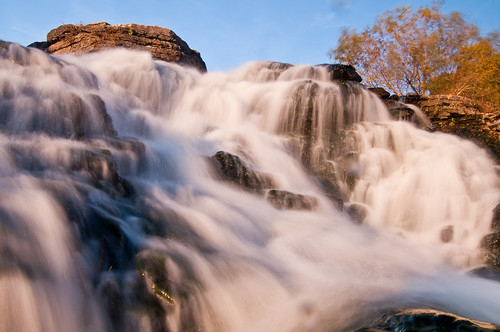
Week 10: Raging Water and How I Almost Went for a Swim with an Expensive Camera.
This is one of those shots I have to ask myself after I took it, was it worth it? I think so. I almost dunked my K-7 with 16-45mm twice, got my feet soaked and almost sent some kid fishing plunging into the water when I slipped :)
When I was in the water I grabbed the camera release instead on the tripod instead of the ball head adjustment lever and the camera flipped forward and plunged toward the water. Good thing my other hand was in front of the camera and was able to stop its fall.
It is hard to get a good angle on these falls from the shore, so I waded out to the middle and set up my tripod. I needed the tripod for the long shutter speed effect. I don't have a suitable neutral density filter so I set the camera to 1/10th second and multi exposure mode and took 9 successive images which the camera combined automatically into a final image. The multi exposure mode gives the same effect as a really long shutter speed, maybe like 10 or 20 seconds equivalent.
Would I do it again? You betchya, but I might be more careful on the mossy rocks. Crampons or something would help a lot as well as water proof boots. My pant leg is still wet.
I finally finished my 365 days project. When I first started I hated pictures of myself and would never dream of taking pictures of myself. Which is why I took up this challenge, and I am glad I did. It was rewarding. I feel like I finally accomplished a year long project. Something I don't do very often.
The main benefit of the 365 was it kept me taking photos every day. I won't lie though, some weeks I just didn't care about it, but I did the pictures anyway and it kept me going. This next year I have something different planned. I want to take more planned/pre-meditated photos, as I think that is a big weakness of mine, I tend to take mostly candid shots.
My thank you goes out to Keitha and Jens that got me started on the project in the first place, and everyone else who has given me support. Especially my wife who is still married to me after the year :)
If you are thinking about doing a 365 self portrait project, and are hesitant to get started because you are afraid of how you look on frame. Don't be. Start today. To get over seeing yourself in the picture, take several shots from several different angles. You will find angles that are more flattering than others. Notice how I avoid the top of my head? The hair is thin and reminds me I am going bald. Same with my belly.
If anyone plans on starting a project and needs the moral support, feel free to add me as a contact on Flickr (follow one of the links below to get to my profile) and I promise to follow your 365 throughout the year :)
I had a great year, and thanks for looking.
I shot most of these with my Pentax DSLR, mostly the K20d, K-2000, and K-7 (since it came out). A couple of the shots below were with the 5d or Pentax 645 too.
Eric
Interesting shot stats: Black and White 85 Hands/Feet: 57 Camera/Lens Included: 34 Reflection: 32 Silhouette: 20 Dangerous Weapons: 13 Film: 11 Eyes: 9 Martial Arts Uniform: 9 Shadow: 5 Fire: 5 Holding Film: 3 Topless: 2
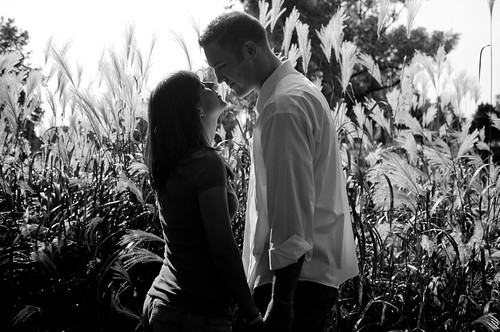
A friend asked me to shoot engagement shots with him, so I needed to find a photographer to model my weekly shot from. Another friend had mentioned a local wedding/engagement photographer name Brian Hall, www.brianhallphotographers.com/main.html.
I looked through his engagement shots and found one I liked. It was a couple kissing in a field backlit so you could just see silhouettes and some definition of figure, so I wanted to replicate something similar. This isn't very close to his shot, but it is where I drew the idea from.
The person I was shooting the engagement shoot with had scouted out the area and took me to a spot with tall grass. It worked fairly well. I worked to define her form with the back-light and her front is defined by his shirt acting as a reflector. If I shot this shot again, I would have moved them further to the left so the tree wasn't behind him and worked on his pose a bit more.
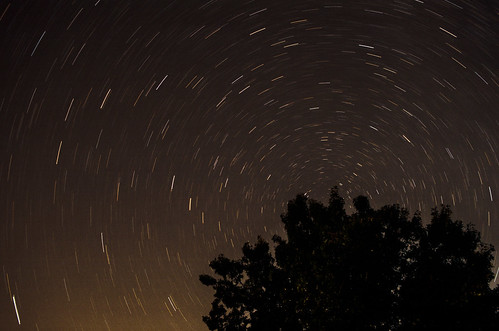
Week 5: My plans were simple this week. Take a picture of a star trail with the north star at the tip of an object (a tree is what I had available without too much light pollution). I was limited to about 20 minutes due to park closure time.
Taken with my SMC Pentax-A 35mm f/2 at about f/4 if I recall correctly for this shot. Fujifilm ASA 200 film and a Pentax MX body on bulb. In an ironic twist of fate, I had sold both my wide angle lenses this week prior to doing my planned shot where I needed a wide angle.
The widest lens I have left is the 35mm f/2 until my 16-45mm f/4 comes in, so I had no choice but to put it on the film body to get a 23mm field of view or so. I took a couple shots with the IR Dimage too, but it is a bit difficult to get bulb shots without a remote :)
To make matters more interesting there was some creature by the lake that would grunt and breath deep whenever I got close. I think it might have been saying "Tailypo, Tailypo, give me back my Tailypo" ( en.wikipedia.org/wiki/Tailypo ), and this is the same lake: www.flickr.com/photos/28177041@N03/3892157437/. Seriously though it was probably just a muskrat or something.
I don't write poetry ever, but for some reason I did 8 years ago today. Here was what I wrote in my journal. It is amazing how this stuff remains around, it has been moved between about 5 computers and hasn't really been looked at in since I wrote it, but has been floating around in a zip file I made before upgrading my computer.
Journal follows:
The other world changing news today was the destruction of the World Trade Center, part of the Pentagon, and the loss of four US commercial airlines. Could be the start of a war. It is disgusting how cowardly people can be; sending terrorist action against thousands of civilians.
Well, I thought I would have more to say, but I don’t. It is been a long and disturbing day. I need to get up early and go work on some homework.
Hopeless souls walking the streets Unaware of the dangers surrounding them Fiery death raining from above The world tumbling to those unsuspecting Who would have known life’s unfair
Events unfolding, life ever mutable A foundation, sturdy as stone Has stood through the ages Crumbles and falls, touched and corrupted
Fingers are pointed, blame is placed To no avail, the blow has been struck Revenge is hollow, remorse deep in heart
From the ashes, a new bird arises Reborn and anew, as life ever cycles Such is the fate, of our ill-lucked race
A short video showing the differences in shutter sounds between the Pentax K-2000 and Pentax K-7. The K-2000 is the entry level camera with a coarse sounding shutter, and the K-7 is the top of the line model which adds a lot of refinement. Both are capable of taking excellent pictures. I show this example so a person coming from one of the other Pentax cameras (K10d, K20d, K200d, K-2000, etc) can get an idea of the refinement in the shutter.
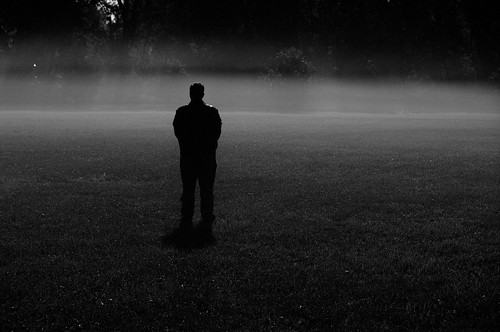
My thought for this photo started during my 365 day project last year. I thought it would be cool to have a picture of me alone in a lake in the middle of the night with a full moon. I thought this would convey a sense of loneliness mixed with fear.
This shot morphed slightly after shooting as I was a little late getting there and the moon was too high in the sky to get the long reflection on the water. Also, at 21mm I am too small in the frame relative to the moon and my face comes out too dark with the moon behind it.
If I shot this shot again, I would do a diptych. One shot of the moon with a telephoto, and another of my face (front lit) by the moon with the moon reflection in the water beside me.
I will say it was a bit creepy walking into a completely calm lake out with no one else around and just the eerie moonlight for lighting. It feels as if you are disturbing the water when you enter it was so calm. I was waiting for a tentacled monster to come out and eat me like in Lord of the Rings ;)
To setup this shot I put my K-7 with DA 21mm on a tripod in the water about 10 feet from shore and it was only 8 inches or so above the water. This had me a bit nervous as the tripod was sinking a bit in the sand, but there were no waves to tip it or anything. Just ISO 100 long exposure shot. Camera was set to interval shooting so I could just float in the water for 5 minutes and hope to get a good shot.
It was an interesting experience to say the least. Trying to sit still in the water is a task when you start hearing noises and start wondering what they are, but you can't move because you don't want to blur the picture ;)
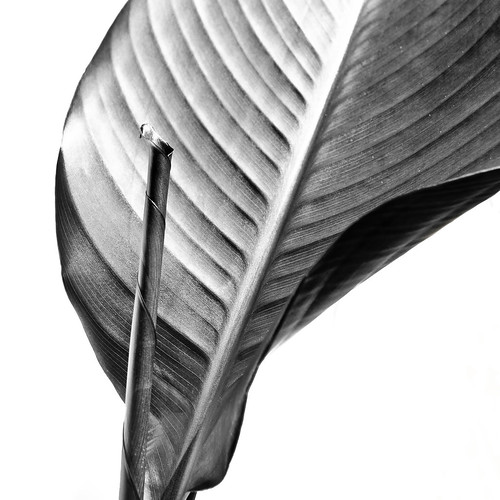
Week 2: My inspiration for this shot was Imogen Cunningham. She was a photographer born in 1883 and passed away in 1976. She was well known for her botanical photography, along with nudes and other work.
She was influential in photography, helping start Group f/64, along with Ansel Adams, and 5 other photographers. This was a group that was pushing a new style of photography with precisely exposed images of natural objects found in nature. It was in contrast to the Pictorialism style that had been popular, which tried to emulate paintings.
Doing this shot I realize how much there is to learn about something as simple as a leaf or flower. How the structure of the leaf is formed, each ridge, vein, and the shape of the blade. How the light catches each little ridge and casts tiny shadows.
Often we see a simple picture of a leaf, and think "that is an easy shot to take", but what we forget is often the artist went to painstaking detail, examining the subject from every angle and lighting condition before ending up with the shot that fit their vision.
I went out for 2 hours in the morning, and although I got a lot of good shots, none were what I was looking for. I went back for another hour in the afternoon to a different location, and still didn't find what I was looking for, but I felt this was closest. I could probably spend an entire week photographing the leaf before finding something I was happy with.
I now have a lot more respect for something as simple as a leaf.
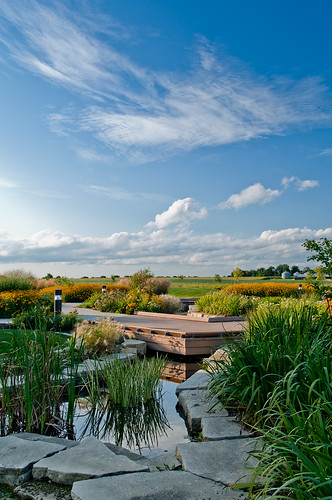
I am posting a video blog today. In the following video I use Lightroom 2 in order to create the above landscape from a single RAW file. The main challenge with this image was the heavily shaded bottom portion of the image. This video addresses how to fix the differing white balances between the background in the sun and the foreground in the shade.
I used a technique known as Expose to the Right (ETTR) with UniWB to properly expose the original RAW file to get the most out of the highlights as I possibly could. The UniWB is basically just a setting where the camera balances the JPG to closely match what the sensor sees, so the histograms, at least the dark and bright points match what is in the RAW file. This allows the in camera histogram to be used to accurately expose the RAW to the right without accidentally clipping data. The normal JPG preview doesn't match the RAW data closely at all.
The main issue I had with this image was after boosting the exposure in the shade, the white balance of the shade is drastically different than that of the sun, so there is a color temperature difference between the two areas of the photograph. In the video I show how to correct for that.
I have been working at getting my Amazon reviewer rank up over the last couple years, for no good reason other than a personal challenge. When I started, I had a couple reviews and was ranked at something like 40,000. I thought that was terrible, I can do better than that. So I wrote more reviews and tried to keep them insightful and on topic. After a while my ranking started to climb. I set a goal to be at 10,000, then 5,000, and now I am at 1,800 or so with a current goal to be under 1,000.
What I noticed recently was some link about "Vine" program and how I should join this to contribute reviews, etc, and get free products. I had seen this for a while on my page, but just thought it was an advertisement and never clicked on it. Well, I finally did last week and found I was being invited to sign up for a program where I can get pre-release books and other products for review with the promise to return reviews (good or bad) for the product.
I am not saying this to brag by any means, but I am actually shocked something beyond satisfaction from completing a personal goal came out of upping my Amazon reviewer ranking. I am excited as this will give me the opportunity to read books that I usually wouldn't read, and I love to write reviews.
Here is my first: The Well Let me know what you think, and be sure to vote if you think it was helpful or not. It is one of my first book reviews, so feel free to comment what I could do better.
I was out enjoying the weather yesterday afternoon when my wife decided to blow some bubbles to entertain our son. I had the camera out, and thought it would be great to capture some photographs of the bubbles. I have tried before, but I have never been very successful. After nearly 100 attempts, this is my favorite.
What I learned in the process is you want to use AF-C (or your cameras continuous focus mode) with all focus points selected. The bubble itself doesn't have very strong contrast, so you will probably need some good reflections to help the camera lock focus on the bubble.
You need big bubbles. This bubble was about 8" in diameter. Search google for "Big Bubble Solution" and you should find some stuff that will work. Most big bubble solutions contain a mix of soap, glycerin, and water. The bubble solution in the colored jugs most of us used as kids does not hold up well for big bubbles.
Close is best. The reflection on the bubble takes on a more interesting perspective when you get up close and personal with it. A close focusing "macro" zoom is ideal. I used the Sigma 17-70mm f/2.8-f/4.5 and it worked out well with its ability to focus right up next to the lens surface, but anything with a minimum focus around 1 to 2 ft should be fine.
When shooting the bubbles, I set to continuous shutter release, and follow after the bubble trying to keep it in focus. Tricky backgrounds will sometimes trick the camera to focus on them instead. Just release the shutter button and try focusing again. Obviously wind is not conducive to catching a good bubble shot. Every time a gust hit my bubbles were gone.
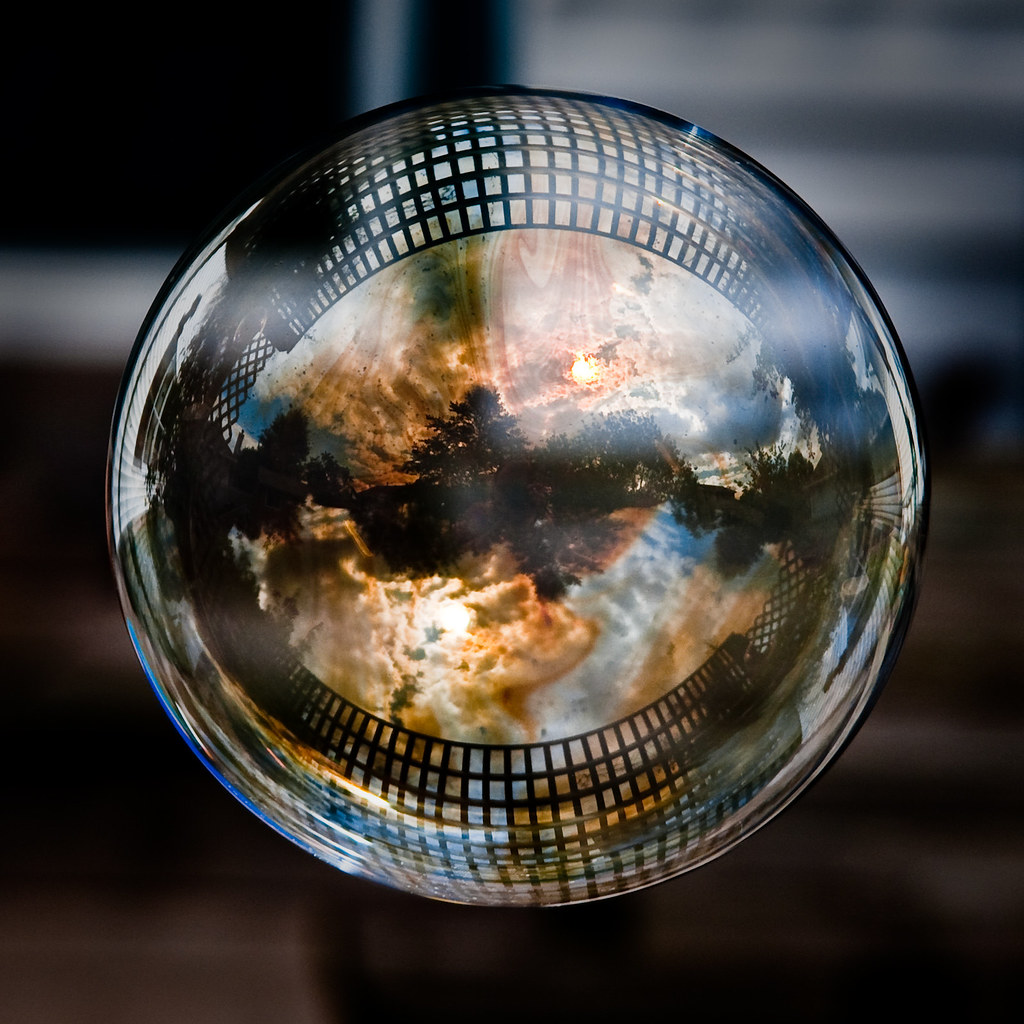
The bubble primarily reflects what is behind the photographer, and thankfully, the photographer gets mostly cut off at the center. It seems to use a fisheye like projection, with a mirror image in both hemispheres, especially visible if the sky is much brighter than the ground. If the sky was darker the image might look a bit more like a circular fisheye, I would think.
So get out there, and try some of your own bubble shots. Try various bubble solutions, and different locations. I want to try one downtown by some tall buildings and surrounded by fire. Go have some fun capturing your own little fragile worlds.
All this talk of bubbles has me reflecting on my own life. We all live in our own little world. Our life follows certain patterns, and if those patterns are interrupted by even the slightest breeze, our life can change course. It is amazing how one seemingly small decision we made 10 years ago dominates our entire life in the present. What would have happened if you didn't make that phone call 10 years ago? How would your life be different?
We are driven by small currents that twist, turn, and combine to drive our life. Capturing photographs of bubbles is like capturing one of these small currents. We realize how fragile and delicate our lives can be. I love photography because I can capture these special moments.
I found a new toy to play with. I have been taking some photographs of flowers lately, and I found I have been wanting a shallow depth of field to blur the background sufficiently, but that leaves too little of the foreground in focus. A friend suggested I try Helicon Focus, a product that stacks images focused at different points into a single image that combines the focused areas from the composing images.
The ability to stack images to make a single image with a deeper depth of field useful for macro or closeup work where the sharpest f/stop for many modern digital cameras is limited to around f/8-f/11 to prevent diffraction from softening the image. Many macro shots might require f/22 or higher to get the desired depth of field.
There is also something known as "hyperfocal distance". If the lens is focused at the hyperfocal distance, everything from half the hyperfocal distance to infinity should be acceptably in focus. In reality though, the closer to infinity or the near range the subject is the softer they will become. Print or view size and distances determine what the true hyperfocal distance is. The problem with hyperfocal distance is it can be a very long ways out for a telephoto lens. You might have to be 200 ft away from your subject.
A solution is to use the Helicon (or equivalent) software to focus at multiple points between the subject and infinity (or the final focus point). These images are then stacked to produce depth of field unachievable by stopping down. A tilting lens/view camera can shift the focus plane out towards infinity, but at the expensive of defocusing somewhere else. This can put the entire picture in focus.
Since perspective is controlled by where you stand relative to the subject (and viewing distance from the print/image), this allows the photographer new ways of achieving differing perspectives. I can use a telephoto/macro lens to photograph a very long object away from the lens and keep the entire length in focus.
The big restriction is you have to take multiple images, so it won't work well on moving subjects. Thankfully they build in some manual retouch tools as well to fix small amounts of movement, etc, but forget it if you are trying to photograph flowers in the wind.
The program is amazingly intuitive to use, and it worked correctly the first time for my simple watch example. On more complicated images where there is a lot of blurring of the background it can be a bit trickier. As an object blurs in either the foreground or background the blur becomes larger the further it is from the focus point. These blurs, for the lack of a better word, can confuse the tool sometimes. Thankfully there is a manual retouch feature built in that works a lot like the selective brush in Lightroom 2 combined with a tool like Clone in Photoshop.
A second problem when focusing on objects progressively further away is the lens focal length changes, and sometimes this is quite substantial, especially with internal focus (IF) lenses. The focal length is measured at infinity. A lens like the Tamron 18-250mm, which is a fine lens BTW, might only be 150mm at close focus, and doesn't reach 250mm until infinity. This causes objects to scale differently and your field of view to change. Thankfully, the tool compensates for this quite nicely automatically rescaling the images to be the appropriate size.
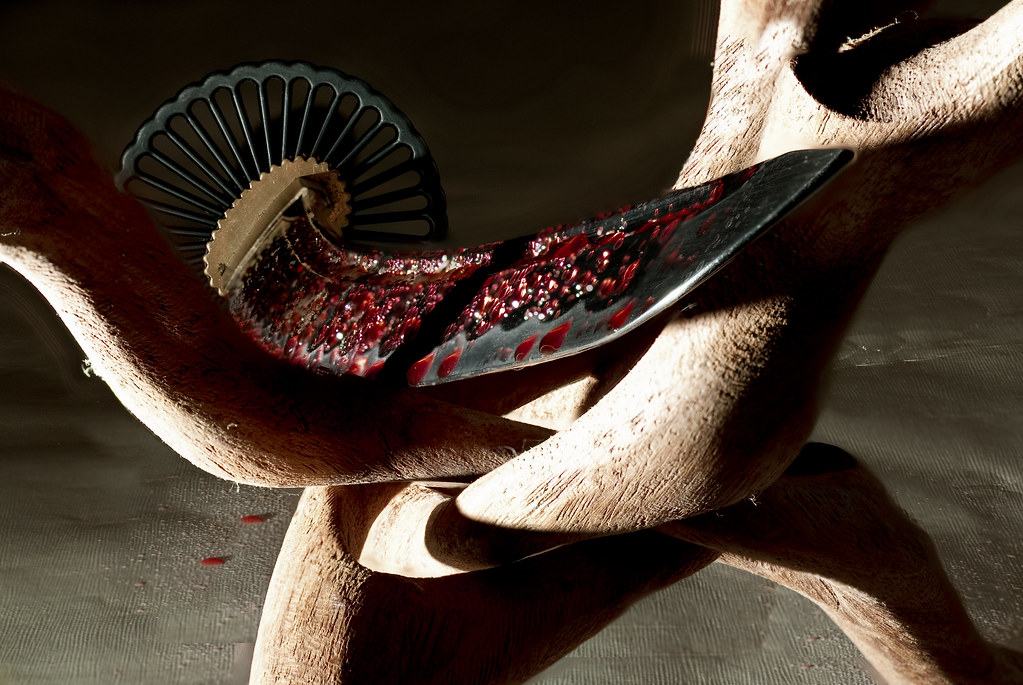
My main lessons learned are to overlap areas of focus a bit, don't use on moving subjects, and watch foreground/background blur that can cause artifacts (see the Iaito, practice sword, above), and use the smallest aperture you can get away with as it limits the problematic foreground/background blur.
I am thrilled to find such a tool, thank you Ryan, as it brings more depth to my photography, horrible pun intended.